2. TensorFlow Inference
2.1. Background
Inference is the process of using a trained model to make predictions or draw conclusions from new, unseen data. It involves applying the learned knowledge and statistical relationships encoded in the model to the input data. When inferring an image, the image is passed through a trained AI model to classify it based on the patterns and knowledge the model has learned.
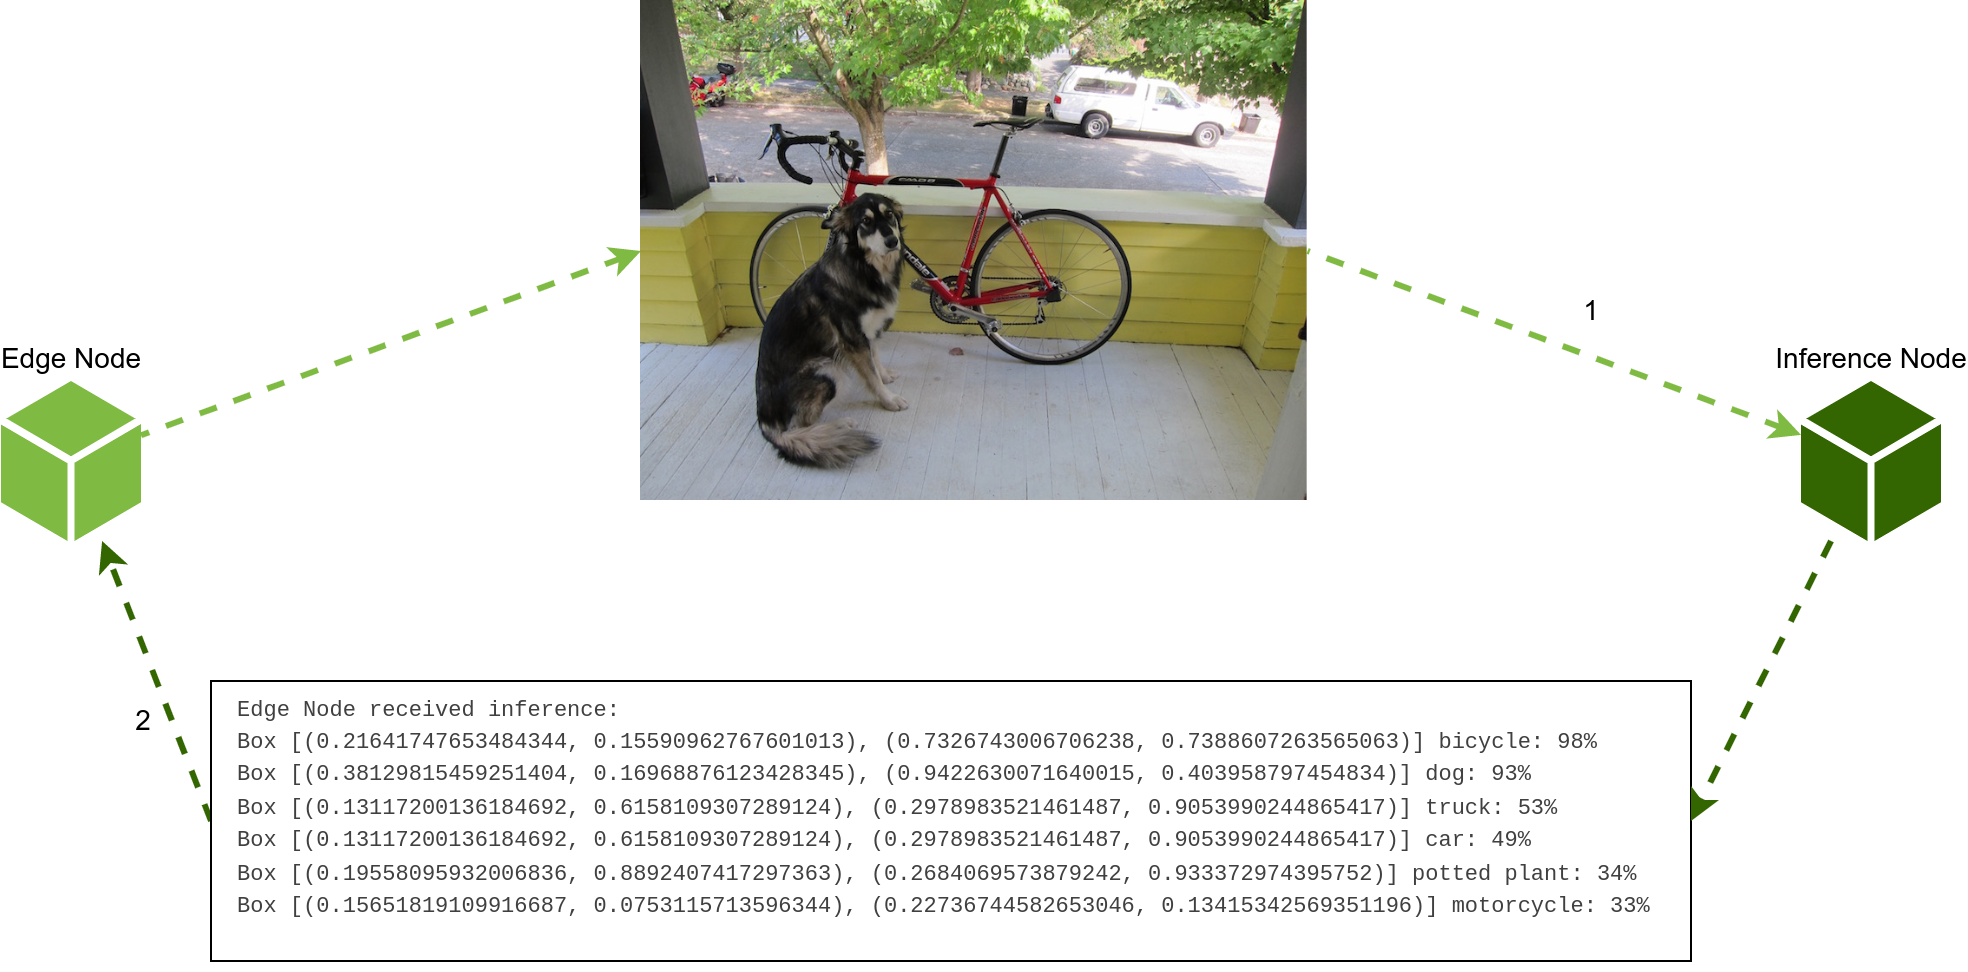
This demo shows how to implement 2 types of nodes, Inference Node and Edge Node, to perform TensorFlow inference on a given image. With these 2 nodes implemented, the user can deploy as many nodes of each kind as desired and check the behavior of a simulated AML-IP network running.
The demo that is presented here follows the schema of the figure below:
TensorFlow is an end-to-end machine learning platform with pre-trained models.
Edge Node simulates an Edge Node. It is implemented in Python using
amlip_pyAPI.Inference Node simulates an Inference Node. It is implemented in Python using
amlip_pyAPI.
2.2. Prerequisites
First of all, check that amlip_tensorflow_inference_demo sub-package is correctly installed.
If it is not, please refer to Build demos.
The demo requires the following tools to be installed in the system:
sudo apt install -y  swig alsa-utils libopencv-dev
pip3 install -U pyttsx3 opencv-python
python -m venv aml-ip-venv
source aml-ip-venv/bin/activate
Ensure that you have TensorFlow and TensorFlow Hub installed in your Python environment before proceeding. You can install them by executing the following commands:
python3 -m pip install tensorflow[and-cuda]
pip3 install tensorflow-hub tensorflow-object-detection-api protobuf==3.20
Additionally, it is required to obtain the TensorFlow model from TensorFlow Hub, follow the steps below:
cd ~/AML-IP-ws/src/AML-IP/amlip_demo_nodes/amlip_tensorflow_inference_demo/resource/tensorflow/models/
wget -O centernet_hourglass_512x512_kpts_1.tar.gz https://tfhub.dev/tensorflow/centernet/hourglass_512x512_kpts/1?tf-hub-format=compressed
mkdir centernet_hourglass_512x512_kpts_1
tar -xvf centernet_hourglass_512x512_kpts_1.tar.gz -C ./centernet_hourglass_512x512_kpts_1
2.3. Building the demo
To build the demo, build the packages with Colcon:
colcon build --packages-up-to amlip_tensorflow_inference_demo
Once AML-IP packages are installed and built, import the libraries using the following command.
source install/setup.bash
2.4. Explaining the demo
In this section, we will explore and explain the demo in detail.
2.4.1. Edge Node
Edge Node serves as the entity responsible for sending the data to be inferred to the Inference Node. The Edge Node is typically located at the edge of a network or closer to the data source, such as a sensor or a device generating the data.
This is the Python code for the Edge Node application. This code can be found here.
The next block includes the Python header files that allow the use of the AML-IP Python API.
from amlip_py.node.AsyncEdgeNode import AsyncEdgeNode, InferenceListenerLambda
from amlip_py.types.InferenceDataType import InferenceDataType
Let’s continue explaining the global variables.
The waiter object is used to pause the node’s execution until the inference result is received.
DOMAIN_ID allows the execution to be isolated because only DomainParticipants with the same Domain Id would be able to communicate to each other.
# Variable to wait to the inference
waiter = BooleanWaitHandler(True, False)

# Domain ID
DOMAIN_ID = 166
The definition of the inference_received function prints the details of the received inference.
def inference_received(
        inference,
        task_id,
        server_id):
    print(f'Edge Node received inference from {server_id}')
    print(f'Edge Node received inference {inference.to_string()}')
    waiter.open()
We define the main function.
def main():
First, we create an instance of AsyncEdgeNode.
The first thing the constructor gets is the given name.
Then a listener,
which is an InferenceListenerLambda object, is created for the function inference_received declared above.
The listener acts as an asynchronous notification system that allows the entity to notify the application about the Status changes in the entity.
This function is called each time an inference is received.
Lastly, a DOMAIN_ID is specified, which allows the execution to be isolated.
    node = AsyncEdgeNode(
        'AMLAsyncEdgeNode',
        listener=InferenceListenerLambda(inference_received),
        domain=DOMAIN_ID)
The next code block loads the image using cv2.imread based on the specified image_path.
It converts the size information and the image into bytes and combines the two to send them to the Inference node.
    current_path = os.path.abspath(__file__)
    image_path = current_path.split('amlip_tensorflow_inference_demo', -1)[0]\
        + 'amlip_tensorflow_inference_demo/resource/tensorflow/models/research\
/object_detection/test_images/dog.jpg'
    img = cv2.imread(image_path)
    width = img.shape[1]
    height = img.shape[0]

    # Convert size to bytes
    str_size = str(width) + ' ' + str(height) + ' | '
    bytes_size = bytes(str_size, 'utf-8')
    # Convert image to bytes
    img_bytes = base64.b64encode(img)
    # Size + images
    img_size_bytes = bytes_size + img_bytes
Next, the request_inference method is invoked to send the image for inference.
task_id = node.request_inference(InferenceDataType(img_size_bytes))
Finally, the program waits for the inference solution using waiter.wait.
waiter.wait()
Once the solution is received, the execution finishes.
2.4.2. Inference Node
The Inference Node is responsible for making the inferences or predictions on the data it receives using a TensorFlow model. The Inference Node is typically a server or a computing resource equipped with high-performance hardware optimized for executing machine learning models efficiently.
This is the Python code for the Inference Node application. This code can be found here.
The next block includes the Python header files that allow the use of the AML-IP Python API.
from amlip_py.node.AsyncInferenceNode import AsyncInferenceNode, InferenceReplierLambda
from amlip_py.types.InferenceSolutionDataType import InferenceSolutionDataType
Let’s continue explaining the global variables.
The DOMAIN_ID variable allows the execution to be isolated because only DomainParticipants with the same Domain Id would be able to communicate to each other.
The tolerance variable sets a threshold to filter out detections with a probability lower than the specified tolerance value.
# Domain ID
DOMAIN_ID = 166

# Not take into account detections with less probability than tolerance
tolerance = 25
The model is loaded from TensorFlow using the specified path.
current_path = os.path.abspath(__file__)
# Initialise model
path = current_path.split('amlip_tensorflow_inference_demo', -1)[0]\
                        + 'amlip_tensorflow_inference_demo/resource/\
tensorflow/models/centernet_hourglass_512x512_kpts_1'
dataset = current_path.split('amlip_tensorflow_inference_demo', -1)[0]\
                           + 'amlip_tensorflow_inference_demo/resource/\
tensorflow/models/research/object_detection/data/mscoco_label_map.pbtxt'

print('Model Handle at TensorFlow Hub: {}'.format(path))
print('loading model...')
hub_model = hub.load(path)
The process_inference function is responsible for computing the inference when data is received.
Inference is performed using the input data and the loaded model.
Note that detected objects are filtered based on the specified tolerance.
def process_inference(
        inference,
        task_id,
        client_id):
    # Size | Image
    height, width = (inference.to_string().split(' | ', 1)[0]).split()
    image_str = inference.to_string().split(' | ', 1)[1]
    # Convert string to bytes
    img_bytes = base64.b64decode(image_str)
    # Convert bytes to image
    image = np.frombuffer((img_bytes), dtype=np.uint8).reshape((int(width), int(height), 3))
    string_inference = ''
    image_np = np.array(image).reshape((1, int(width), int(height), 3))
    results = hub_model(image_np)
    result = {key: value.numpy() for key, value in results.items()}
    category_index = label_map_util.create_category_index_from_labelmap(dataset,
                                                                        use_display_name=True)
    classes = (result['detection_classes'][0]).astype(int)
    scores = result['detection_scores'][0]
    for i in range(result['detection_boxes'][0].shape[0]):
        if (round(100*scores[i]) > tolerance):
            boxes = result['detection_boxes'][0]
            box = tuple(boxes[i].tolist())
            ymin, xmin, ymax, xmax = box
            string_inference = string_inference + \
                'Box [({}, {}), ({}, {})] {}: {}% \n' \
                .format(xmin, ymin, xmax, ymax, category_index[classes[i]]['name'],
                        round(100*scores[i]))
    print('Inference ready!')
    print('sending inference: ' + string_inference)
    return InferenceSolutionDataType(string_inference)
We define the main function.
def main():
We create an instance of AsyncInferenceNode.
The first thing the constructor gets is the name AMLInferenceNode.
Then a listener,
which is an InferenceReplierLambda object, is created for the function process_inference declared above.
This means that the process_inference function will be called to handle the inference requests.
Additionally, the domain is specified using the DOMAIN_ID variable.
    node = AsyncInferenceNode(
        'AMLInferenceNode',
        listener=InferenceReplierLambda(process_inference),
        domain=DOMAIN_ID)
This initiates the Inference Node, which will listen for incoming inference requests and invoke the process_inference function to handle them.
node.run()
Finally, the node waits for a SIGINT signal (Ctrl+C) to stop and close gracefully.
    def handler(signum, frame):
        pass
    signal.signal(signal.SIGINT, handler)
    signal.pause()

    node.stop()
2.5. Run demo
This demo explains the implemented nodes in amlip_demo_nodes/amlip_tensorflow_inference_demo.
2.5.1. Run Edge Node
In one terminal, run the Edge Node with the following command:
# Source colcon installation
source install/setup.bash

# To execute Edge Node to send an image to inferred
cd ~/AML-IP-ws/src/amlip/amlip_demo_nodes/amlip_tensorflow_inference_demo/amlip_tensorflow_inference_demo
python3 edge_node_async.py
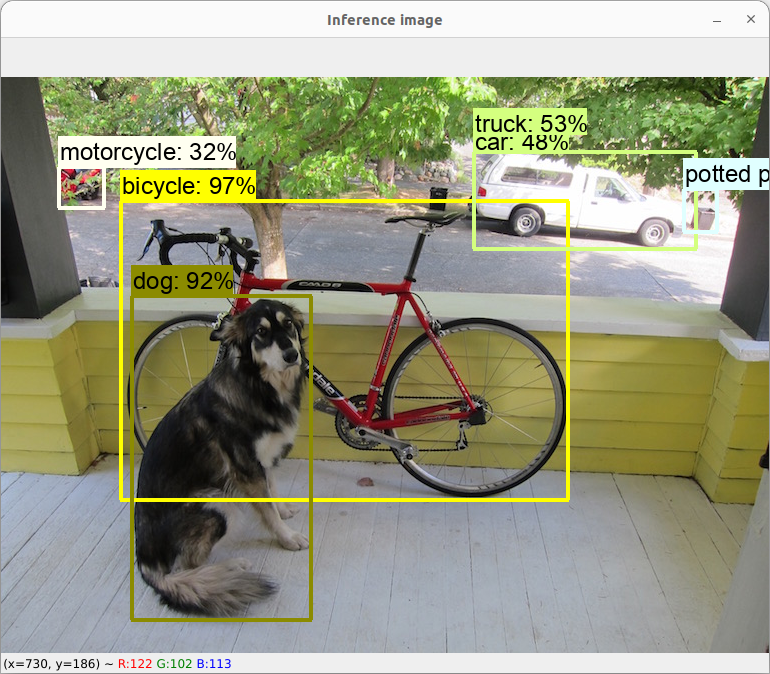
Take into account that this node will wait until there is an Inference Node running and available in the same LAN in order to process the inference. The expected output is the following:
Edge Node AMLEdgeNode.fb.d4.38.13 ready.
Edge Node AMLEdgeNode.fb.d4.38.13 sending data.

Edge Node received inference from AMLInferenceNode.b8.34.4d.a3
Edge Node received inference:
Box [(0.15590962767601013, 0.21641747653484344), (0.7388607263565063, 0.7326743006706238)] bicycle: 97%
Box [(0.16968876123428345, 0.38129815459251404), (0.403958797454834, 0.9422630071640015)] dog: 92%
Box [(0.6158109307289124, 0.13117200136184692), (0.9053990244865417, 0.2978983521461487)] truck: 53%
Box [(0.6158109307289124, 0.13117200136184692), (0.9053990244865417, 0.2978983521461487)] car: 48%
Box [(0.8892407417297363, 0.19558095932006836), (0.933372974395752, 0.2684069573879242)] potted plant: 34%
Box [(0.0753115713596344, 0.15651819109916687), (0.13415342569351196, 0.22736744582653046)] motorcycle: 32%

Edge Node AMLEdgeNode.fb.d4.38.13 closing.
2.5.2. Run Inference Node
In a second terminal, run the following command to process the inference:
# Source colcon installation
source install/setup.bash

# To execute Inference Node with pre-trained model from TensorFlow
cd ~/AML-IP-ws/src/AML-IP/amlip_demo_nodes/amlip_tensorflow_inference_demo/amlip_tensorflow_inference_demo
python3 inference_node_async.py
The execution expects an output similar to the one shown below:
2023-02-14 14:50:42.711797: I tensorflow/core/platform/cpu_feature_guard.cc:193] This TensorFlow binary is optimized with oneAPI Deep Neural Network Library (oneDNN) to use the following CPU instructions in performance-critical operations:  AVX2 FMA
To enable them in other operations, rebuild TensorFlow with the appropriate compiler flags.
Inference Node AMLInferenceNode.b8.34.4d.a3 ready.
Model Handle at TensorFlow Hub: /home/user/AML-IP-ws/src/AML-IP/amlip_demo_nodes/amlip_tensorflow_inference_demo/resource/tensorflow/models/centernet_hourglass_512x512_kpts_1
loading model...
WARNING:absl:Importing a function (__inference_batchnorm_layer_call_and_return_conditional_losses_42408) with ops with unsaved custom gradients. Will likely fail if a gradient is requested.
WARNING:absl:Importing a function (__inference_batchnorm_layer_call_and_return_conditional_losses_209416) with ops with unsaved custom gradients. Will likely fail if a gradient is requested.
WARNING:absl:Importing a function (__inference_batchnorm_layer_call_and_return_conditional_losses_220336) with ops with unsaved custom gradients. Will likely fail if a gradient is requested.
...
WARNING:absl:Importing a function (__inference_batchnorm_layer_call_and_return_conditional_losses_55827) with ops with unsaved custom gradients. Will likely fail if a gradient is requested.
WARNING:absl:Importing a function (__inference_batchnorm_layer_call_and_return_conditional_losses_56488) with ops with unsaved custom gradients. Will likely fail if a gradient is requested.
model loaded!
Selected model:tensorflow
2023-02-14 14:51:14.165305: W tensorflow/core/grappler/optimizers/loop_optimizer.cc:907] Skipping loop optimization for Merge node with control input: StatefulPartitionedCall/cond/then/_918/cond/Assert_2/AssertGuard/branch_executed/_1123
inference ready!
sending inference:
Box [(0.15590962767601013, 0.21641747653484344), (0.7388607263565063, 0.7326743006706238)] bicycle: 97%
Box [(0.16968876123428345, 0.38129815459251404), (0.403958797454834, 0.9422630071640015)] dog: 92%
Box [(0.6158109307289124, 0.13117200136184692), (0.9053990244865417, 0.2978983521461487)] truck: 53%
Box [(0.6158109307289124, 0.13117200136184692), (0.9053990244865417, 0.2978983521461487)] car: 48%
Box [(0.8892407417297363, 0.19558095932006836), (0.933372974395752, 0.2684069573879242)] potted plant: 34%
Box [(0.0753115713596344, 0.15651819109916687), (0.13415342569351196, 0.22736744582653046)] motorcycle: 32%

Inference sent to client AMLEdgeNode.fb.d4.38.13.
Warning
If you encounter an output similar to the next one, follow the set of instructions outlined below:
terminate called after throwing an instance of 'Swig::DirectorMethodException'
    what():  SWIG director method error. In method 'process_inference': AttributeError: module 'tensorflow' has no attribute 'gfile'
Aborted (core dumped)
2.6. Run multiple nodes of each kind
One of the advantages inherent to this architecture lies in its ability to support multiple models operating concurrently across multiple Inference Node, while simultaneously requesting inferences from Edge Node in parallel. This architectural design fosters a highly efficient and scalable system, enabling the execution of diverse inference tasks in a distributed manner.
2.7. How to use your own model
To use your own model, simply download it and load it by passing the path to the function:
hub_model = hub.load(your_model_path)
2.8. Troubleshooting
2.8.1. TensorFlow using old API
Please be aware that Simple TensorFlow Serving is currently not compatible with TensorFlow 2.0 due to its reliance on the older API. It is important to note that in TensorFlow 2.0, the gfile package has been relocated under the tf.io module. Therefore, if you intend to utilize TensorFlow 2.0, please take into consideration this change in the package structure and update your code accordingly. Check following issue for further information.
To update the code, please follow these steps:
Locate the file label_map_util.py. (default path:
.local/lib/python3.x/site-packages/object_detection/utils/label_map_util.py)Navigate to line 132 within the file.
Replace tf.gfile.GFile with tf.io.gfile.GFile.
2.9. Next Steps
Now you can develop more functionalities in your application. See also this tutorial which explains how to take the image from a ROSbot 2R Camera.