3. TensorFlow Inference using ROSbot 2R
3.1. Background
This document provides detailed instructions on deploying an Edge Node on a ROSbot 2R from Husarion. The Edge Node will capture images using the Orbbec Astra camera and sends them to the Inference Node deployed on a laptop to perform TensorFlow inference on the given image. If the TensorFlow inference detects the presence of a person with a probability of 80% or higher, the robot will turn.
In this demo we will use the simulation of ROSbot 2R - an autonomous mobile robot by Husarion, designed for learning ROS and for research and development purposes. It is an affordable platform that can serve as a base for a variety of robotic applications, including inspection robots and custom service robots. The robot features a solid aluminum frame and is equipped with a Raspberry Pi 4 with 4GB of RAM, distance sensors, an RPLIDAR A2 laser scanner, and an RGB-D Orbbec Astra camera.

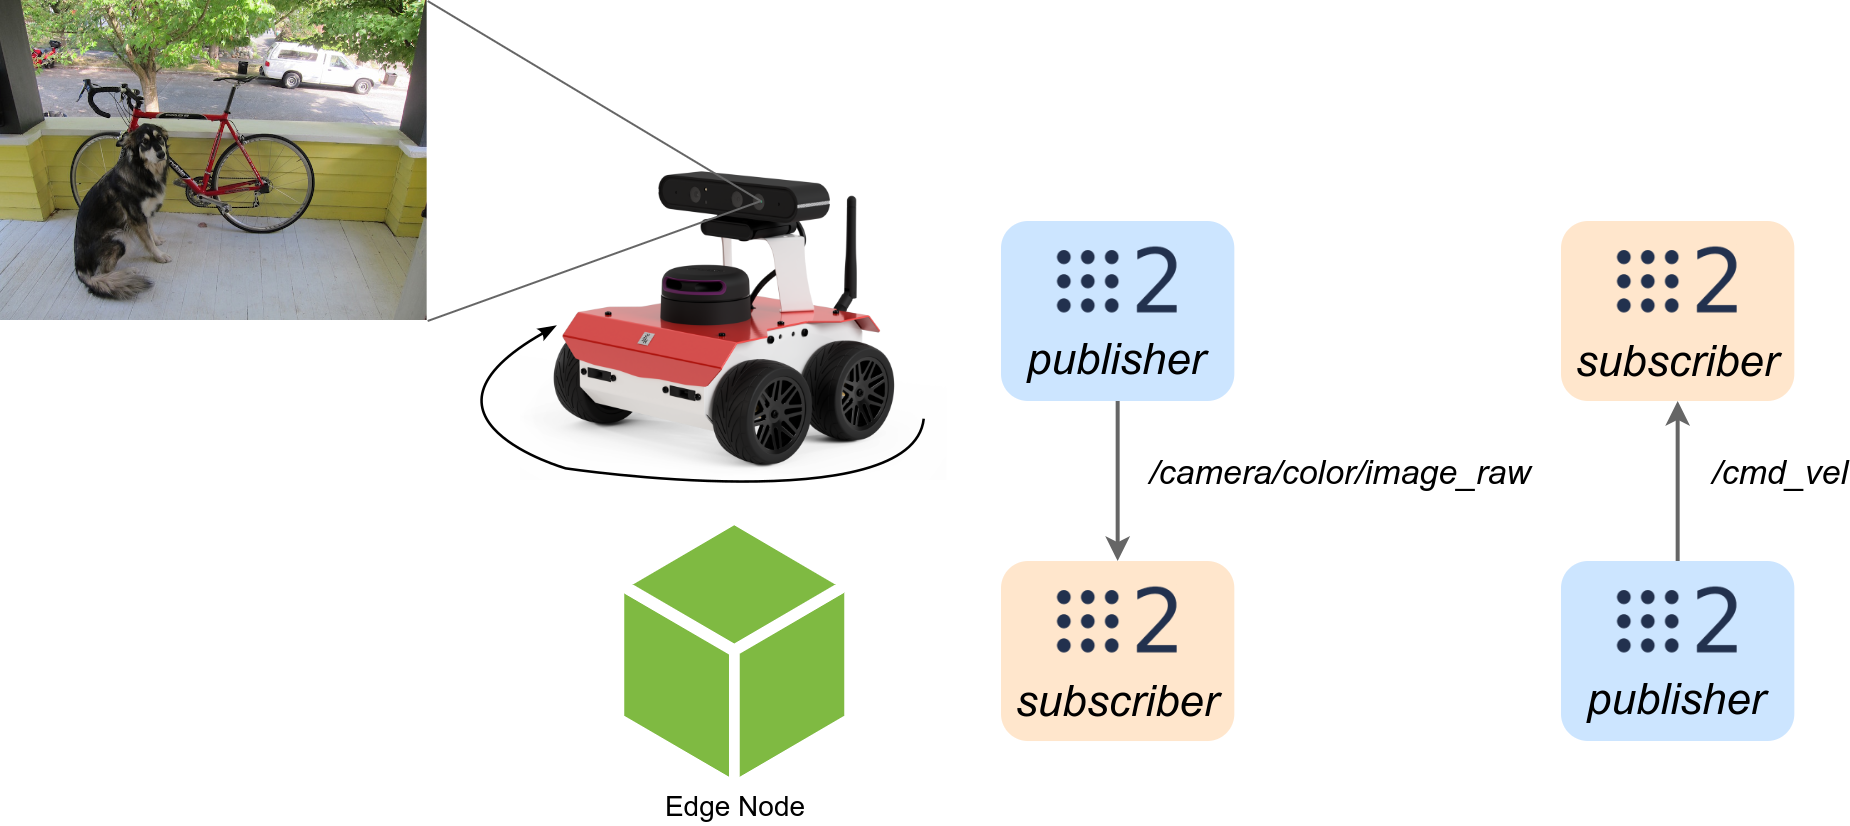
The demo that is presented here follows the scheme of the figure below:

Note
This tutorial assumes the reader has already reviewed previous tutorial, understands how Edge and Inference Nodes work and what the installation requirements are.
3.2. Prerequisites
Build amlip-demos:inference-tensorflow Docker Image from the workspace where the Dockerfile is located. In order to do so, execute the following:
cd ~/AML-IP-ws/src/AML-IP/amlip_demo_nodes/amlip_tensorflow_inference_rosbot2r_demo
docker build -t amlip-demos:inference-tensorflow -f Dockerfile .
Note
Use –no-cache argument to restart build.
3.3. ROSbot 2R Deployment
The Docker Compose used for the demo is compose.yaml.
You can find it here.
The Docker Compose launches the following containers:
astra: allows the usage of Orbbec 3D cameras with ROS Humble. It publishes the images captured by the camera to the
/camera/color/image_rawtopic. Edge Node can then subscribe to this topic to receive and process the camera images.
astra:
    image: husarion/astra:humble
    network_mode: host
    ipc: host
    devices:
    - /dev/bus/usb/
    volumes:
    - ./astra_params.yaml:/ros2_ws/install/astra_camera/share/astra_camera/params/astra_mini_params.yaml
    privileged: true
    command: ros2 launch astra_camera astra_mini.launch.py
rosbot: starts all base functionalities for ROSbot 2R. It subscribes to the
/cmd_veltopic. This topic is used to control the movement of a robot by publishing velocity commands to it.
rosbot:
    image: husarion/rosbot:humble
    network_mode: host
    ipc: host
    privileged: true
    command: ros2 launch rosbot_bringup bringup.launch.py mecanum:=False
microros: communicates with all firmware functionalities.
microros:
    image: husarion/micro-ros-agent:humble
    network_mode: host
    ipc: host
    devices:
    - ${SERIAL_PORT:?err}
    environment:
    - SERIAL_PORT
    privileged: true
    command: ros2 run micro_ros_agent micro_ros_agent serial -D $SERIAL_PORT serial -b 576000 # -v6
edge: is responsible for starting up the execution of the AML-IP Edge Node explained below.
edge:
    image: amlip-demos:inference-tensorflow
    network_mode: host
    ipc: host
    privileged: true
    command: bash -c "sleep 5 && source ./install/setup.bash && python3 ./src/amlip/amlip_demo_nodes/amlip_tensorflow_inference_rosbot2r_demo/amlip_tensorflow_inference_rosbot2r_demo/edge_node_async.py"
The following diagram illustrates the flow of the explained code:
3.4. Working with AML-IP
Through this section, we will delve into the details of the demo, examining the underlying concepts and processes involved.
3.4.1. Edge Node
Edge Node serves as the entity responsible for sending the data to be inferred to the Inference Node. The Edge Node is typically located at the edge of a network or closer to the data source, such as a sensor or a device generating the data. In this specific scenario, the data source is the camera of the robot.
The Python code for the Edge Node is explained in the previous tutorial, so here we will focus on the additional features added to this demo. You can find the complete code here.
The next block includes the Python header files that allow the use of the AML-IP Python API and ROS 2.
from amlip_py.node.AsyncEdgeNode import AsyncEdgeNode, InferenceListenerLambda
from amlip_py.types.InferenceDataType import InferenceDataType

from cv_bridge import CvBridge      # Package to convert between ROS and OpenCV Images

from geometry_msgs.msg import Twist

from py_utils.wait.BooleanWaitHandler import BooleanWaitHandler

import rclpy
from rclpy.node import Node
from rclpy.qos import QoSDurabilityPolicy
from rclpy.qos import QoSHistoryPolicy
from rclpy.qos import QoSProfile
from rclpy.qos import QoSReliabilityPolicy

from sensor_msgs.msg import Image
Continuing, the SubscriberImage ROS 2 Node subscribes to the /camera/color/image_raw topic to receive images from a camera sensor.
It converts the received ROS Image message to an OpenCV image using the CvBridge package.
The image data is stored in the image attribute of the node.
class SubscriberImage(Node):

    def __init__(self):
        super().__init__('subscriber_image')
        custom_qos_profile = QoSProfile(
                            depth=4,
                            reliability=QoSReliabilityPolicy.BEST_EFFORT)

        self.subscription = self.create_subscription(
            Image,
            '/camera/color/image_raw',
            self.listener_callback,
            custom_qos_profile)
        # Used to convert between ROS and OpenCV images
        self.br = CvBridge()
        self.image = None
        self.image_arrive = False

    def listener_callback(self, msg):
        self.get_logger().info('I received an image!!')
        # Convert ROS Image message to OpenCV image
        self.image = self.br.imgmsg_to_cv2(msg)
        self.image_arrive = True
The PublisherVel ROS 2 Node publishes Twist messages to the /cmd_vel topic, which controls the velocity of the ROSbot 2R.
In the provided code, the turn method is implemented to set linear and angular velocities, causing the robot to turn.
class PublisherVel(Node):

    def __init__(self):
        super().__init__('publisher_velocity')
        custom_qos_profile = QoSProfile(
                            history=QoSHistoryPolicy.KEEP_ALL,
                            durability=QoSDurabilityPolicy.TRANSIENT_LOCAL,
                            reliability=QoSReliabilityPolicy.BEST_EFFORT)

        self.pub = self.create_publisher(
            Twist,
            '/cmd_vel',
            custom_qos_profile)

    def turn(self):
        msg = Twist()

        msg.linear.x = 0.1
        msg.linear.y = 0.0
        msg.linear.z = 0.0

        msg.angular.x = 0.0
        msg.angular.y = 0.0
        msg.angular.z = -1.0

        self.pub.publish(msg)
Then, the definition of turn_rosbot function initializes the PublisherVel Node and repeatedly calls the turn method to make the ROSbot turn.
def turn_rosbot():
    node = PublisherVel()

    print('Turn ROSbot')
    loop = 0
    while rclpy.ok() and loop < 13:
        node.turn()
        time.sleep(0.5)
        loop += 1

    node.destroy_node()
After that, the check_data function extracts labels and percentages from the inference string received from the Edge Node.
It searches for the label person with a confidence percentage greater than or equal to 80%.
If a person is detected, it calls the turn_rosbot function to make the robot turn.
def check_data(str_inference):
    labels = re.findall(r'\b(\w+):', str_inference)
    percentages = re.findall(r'(\d+)%', str_inference)
    print('Labels: ')
    print(labels)
    print('Percentages: ')
    print(percentages)
    for i in range(len(labels)):
        if (labels[i] == 'person' and int(percentages[i]) >= 80):
            print('Found a person!')
            turn_rosbot()
            return
    print('No person found :(')
The main function initializes the SubscriberImage Node to receive images from the ROSbot 2R camera and waits until an image arrives before proceeding.
The received image is then used to create the AsyncEdgeNode.
The image is encoded as bytes and sent to the Edge Node for inference using the request_inference method as in the previous demo.
def main():
    rclpy.init(args=None)

    minimal_subscriber = SubscriberImage()

    # Create Node
    node = AsyncEdgeNode(
        'AMLAsyncEdgeNode',
        listener=InferenceListenerLambda(inference_received),
        domain=DOMAIN_ID)

    while True:

        while rclpy.ok() and not minimal_subscriber.image_arrive:
            rclpy.spin_once(minimal_subscriber, timeout_sec=1)

        img = minimal_subscriber.image

        print(f'Async Edge Node {node.id()} ready.')

        width = img.shape[1]
        height = img.shape[0]

        # Convert size to bytes
        str_size = str(width) + ' ' + str(height) + ' | '
        bytes_size = bytes(str_size, 'utf-8')
        # Convert image to bytes
        img_bytes = base64.b64encode(img)
        # Size + images
        img_size_bytes = bytes_size + img_bytes

        print(f'Edge Node {node.id()} sending data.')

        task_id = node.request_inference(InferenceDataType(img_size_bytes))

        print(f'Request sent with task id: {task_id}. Waiting inference...')

        # Wait to received solution
        waiter.wait()

        minimal_subscriber.image_arrive = False

    # Closing
    minimal_subscriber.destroy_node()
    rclpy.shutdown()

    print(f'Edge Node {node.id()} closing.')
3.4.2. Inference Node
The Inference Node is responsible for making the inferences or predictions on the data it receives using a TensorFlow model. The Inference Node is typically a server or a computing resource equipped with high-performance hardware optimized for executing machine learning models efficiently.
The Python code for the Inference Node is explained in the previous tutorial and can be found here.
3.5. Run demo
3.5.1. Bring up ROSbot 2R and run Edge Node
First, it is necessary to launch the docker compose compose.yaml that will activate the containers astra, rosbot, microros and edge.
Start the containers in a new ROSbot terminal, run the following command:
cd ~/AML-IP-ws/src/AML-IP/amlip_demo_nodes/amlip_tensorflow_inference_rosbot2r_demo
docker compose up
3.5.2. Run Inference Node
In a terminal on your laptop, run the following command in order to process the inference:
# Source colcon installation
source install/setup.bash

# To execute Inference Node with pre-trained model from TensorFlow
cd ~/AML-IP-ws/src/AML-IP/amlip_demo_nodes/amlip_tensorflow_inference_rosbot2r_demo/amlip_tensorflow_inference_rosbot2r_demo
python3 inference_node_async.py
3.5.3. Teleoperate ROSbot 2R
Note that ROSbot 2R subscribes to the /cmd_vel topic.
To teleoperate it, you can use the teleop_twist_keyboard node, which allows you to control the robot using keyboard inputs.
Follow these steps:
# Source ROS 2 installation
source install/setup.bash

ros2 run teleop_twist_keyboard teleop_twist_keyboard